Zephyr Basics: Bluetooth Low Energy (BLE) - Part 2: Central
In this blog post, we will program an ESP32 to act as a Smart Button capable of toggling the state of the Smart LED we programmed in the last post. You will learn how to parse advertisements, connect and disconnect from peripherals, find services using service discovery, and how to read and to write attributes.
In the following paragraphs, I will lead you through the hardware setup, the source code structure, an overview of the state machine we are going to program, and the implementation details.
Hardware Setup
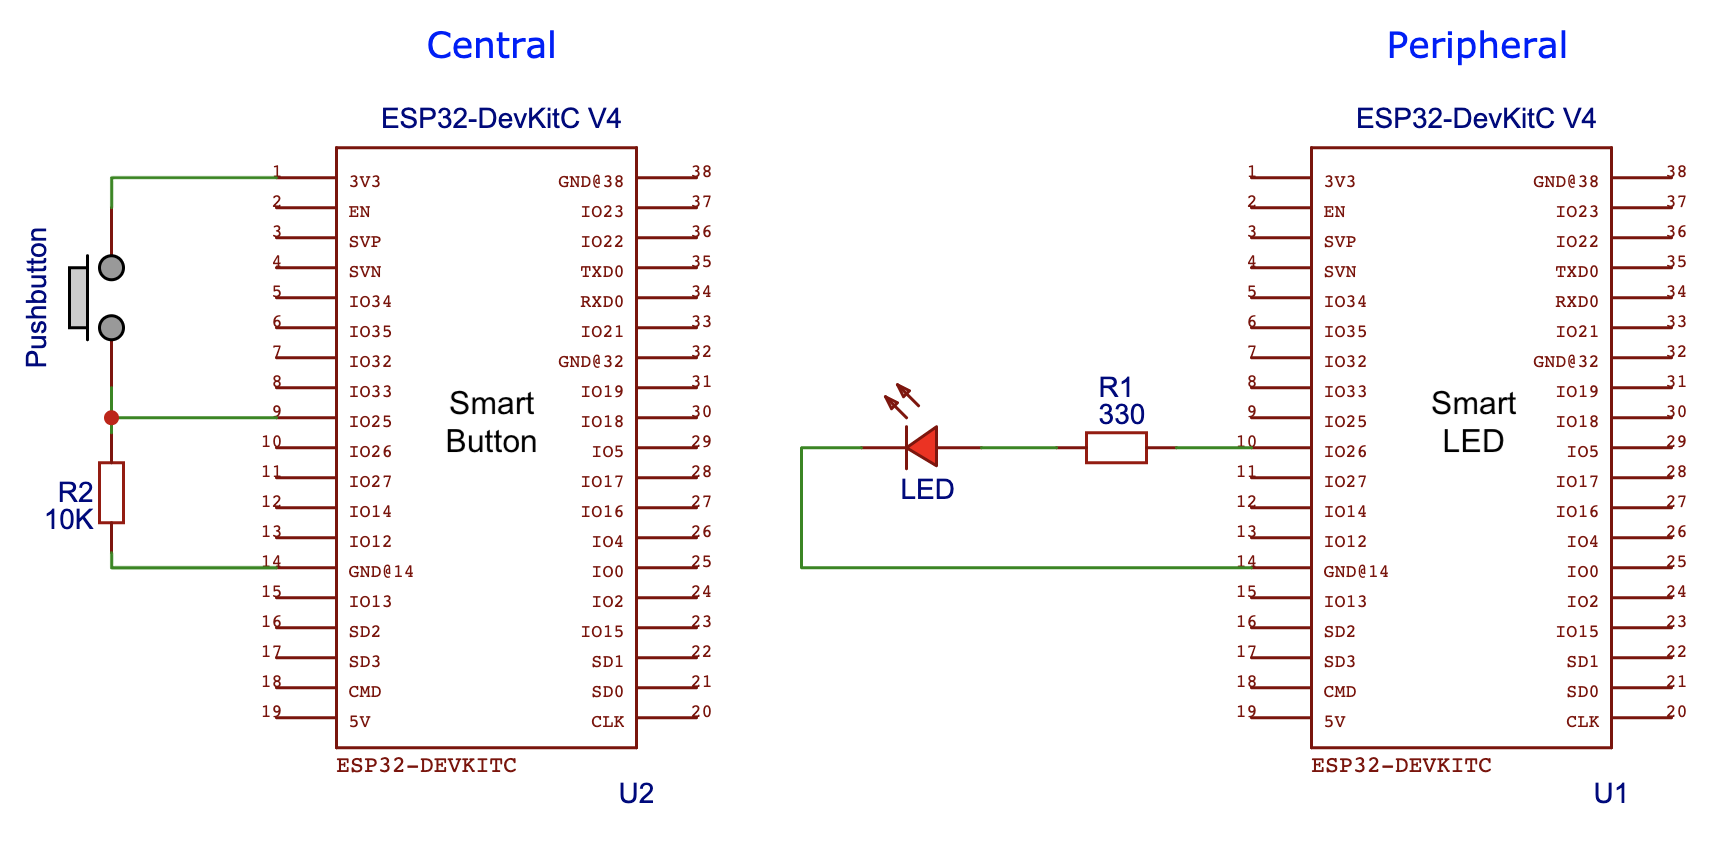
I am using two ESP32 Dev Kit C4 for this tutorial, but you may use any other BLE-enabled board/controller supporting Zephyr. If you haven’t already, please read my post about GPIOs first. I covered LEDs, buttons, and devicetree overlays. To follow along, connect a pushbutton with a pull-down resistor to the Smart Button and an LED with a resistor to the Smart LED:
By now you should know the drill! Create the following two files in the root folder of your project:
esp32.overlay:
/ {
	buttons {
		compatible = "gpio-keys";
		button0: button_0 {
			gpios = <&gpio0 25 GPIO_ACTIVE_HIGH>;
			label = "Button";
		};
	};
};
prj.conf:
CONFIG_GPIO=y
CONFIG_BT=y
CONFIG_BT_CENTRAL=y
CONFIG_BT_GATT_CLIENT=y
CONFIG_EVENTS=y
With the devicetree overlay, we can reference the button in our program using the name button0, instead of hard coding the pin number. The following code does all the hardware setup:
#include <drivers/gpio.h>
#include <zephyr.h>

static const struct gpio_dt_spec button =
    GPIO_DT_SPEC_GET(DT_NODELABEL(button0), gpios);

void main(void) {
  // make sure the GPIO device is ready
  if (!device_is_ready(button.port)) {
    return;
  };

  // configure the button pin
  gpio_pin_configure_dt(&button, GPIO_INPUT);
  gpio_pin_interrupt_configure_dt(&button, GPIO_INT_EDGE_TO_ACTIVE);
}
The setup is similar to the Smart LED: First, we fetch the device specifications of the Button (the pin number) and store it in the static variable button. In the main function, we first check if the button device is ready (in a real production app you would need to handle the error case as well!). Afterward, we set the pin as input and and configure it to raise an interrupt on rising edge.
Every time the button is pressed our main program will stop and the code associated with (or attached to) the interrupt will run. You don’t need to setup the interrupt yourself, Zephyr can do it for your. Add the following to your main function after the hardware setup:
// setup the button press callback
gpio_init_callback(&button_cb_data, button_callback, BIT(button.pin));
gpio_add_callback(button.port, &button_cb_data);
This will configure the interrupt to run the function button_callback each time the button is pressed. The callback and the associated data must be declared before the main function:
#define BUTTON_TIMEOUT_MS 250

static struct gpio_callback button_cb_data;
static uint64_t last_press_time = 0;

static void button_callback(const struct device *dev, struct gpio_callback *cb,
                            uint32_t pins) {
  uint64_t now = k_uptime_get();
  if ((now - last_press_time) > BUTTON_TIMEOUT_MS) {
    printk("Button pressed\n");
    ble_toogle_led();
  }
  last_press_time = now;
}
In the callback, we use a simple timing-based debounce method. Every time the button is pressed, we fetch the uptime and compare it with the uptime stored when the button was pressed the last time. Only presses with a time difference of more than 250ms will be considered valid presses. Once a valid press is detected, the function ble_toggle_led() is called.
Source Structure
Where does the function ble_toggle_led() come from? This time we will split our project into 3 files: The code you just saw is located in main.c and takes care of the button hardware setup. The BLE-related code is located in the files ble.c and ble.h.
The header exposes two functions: ble_setup() and ble_toggle_led() for our main program to use. The setup function must be called once at the end of the main function and the toggle function must be called each time you want to toggle the LED.
The implementation of the functions is in the source file ble.c. It contains all the necessary data and logic for our Smart Button peripheral. Before we dive into the code, let us look at the logic in form of a state machine.
State Machine
What exactly must our Smart Button do? If you press the button, it searches for the Smart LED, connects to it, and toggles the state of the LED. Sounds quite simple? Here is the full state machine which we will implement:

The logic starts on button press. We have to differentiate between two scenarios: Is it the first time you press the button? If so, we are not yet connected to the Smart LED and we must first search for it. We will not implement a disconnect mechanism in our program (feel free to add this as an exercise). This means that on a subsequent button press, you don’t need to search for the button anymore, the connection will stay established.
Let’s say we are not yet connected: The Smart Button must scan for the Smart LED’s advertisements. It parses every received advertisement package for the LED Service UUID we implemented in part 1. If an ad is found with our UUID a connection will be established.
Now that we are connected: How can we read the current state of the LED? You know the LED state characteristic UUID, right? The UUID is not used for reading and writing directly, instead, we use so-called characteristic handles. The reason why is simple: You save bandwidth, the UUID is 16 bytes and the handle is only 2 bytes. If we press the button for the first time, we don’t know the handle yet. The process of enquiring a peripheral for the handle is called Service Discovery. In practice, you might not need to do this, if you know the handle and you know that the attribute table in your peripheral doesn’t change.
Once we have the handle, we can read the current state of the LED, negate it and write it back to the Smart LED.
State Machine Implementation
How do you implement a state machine in Zephyr? Even though Zephyr has a State Machine Framework, we are going to implement the state machine using the much simpler kernel primitives: Semaphores, Workqueue, and Events.
Semaphores
Remember that on each button press we call the function ble_toogle_led(). What happens if the user presses the button multiple times? We already integrated the 250ms debounce timeout, but what happens if scanning, service discovery, and reading/writing the state takes longer than that? We have to prevent that the state machine is called again before the previous call has finished. This is a perfect use case for semaphores!
A semaphore is a numerical value representing the number of resources currently available to use. In our case, the resource is the BLE hardware. We cannot run the state machine concurrently, there is only one BLE antenna to send and receive data.
The following code creates a semaphore of capacity 1 and shows how it is consumed in the function ble_toggle_led():
K_SEM_DEFINE(sem, 1, 1);

(...)

void ble_toogle_led() {
  if (k_sem_take(&sem, K_NO_WAIT) != 0) {
    return;
  };

  k_work_submit(&work);
}
Every time the function is called, it tries to acquire the semaphore. If the semaphore is taken, you could wait for it to be available again, but in our case, we simply return (ignoring the button press). If the semaphore is available, we take it and thus prevent consequential button presses to take it again before the semaphore has been released. After taking the semaphore, we start our state machine implemented in a separate thread called workqueue by calling k_work_submit().
Workqueue
Workqueues are kernel objects that use a dedicated system thread to process work given to them. Their main use case is for high-priority tasks to offload possibly slow low-priority work into a separate background task. To do this you must first create a k_work struct and initialize it in the ble_setup() function:
static struct k_work work;

(...)

void ble_setup() {
  int err;

  err = bt_enable(NULL);
  if (err) {
    printk("Bluetooth init failed (err %d)\n", err);
    return;
  }
  printk("Bluetooth initialized\n");

  k_work_init(&work, work_handler);
}
The function k_work_init() attaches the work handler function work_handler() to the work object. This function will be executed every time the button is pressed (if we can acquire the semaphore!) and it contains the actual state machine logic.
Events
Before we can dive into the implementation of the work handler, we fist need to take a look at the events. Events are kernel objects for synchronization. You can use them for inter-thread information exchange. Imagine you have two threads: One thread that samples a sensor and another thread that processes the samples. Using events the sample thread can send out a SAMPLE_EVENT each time it collects a sample. The processing thread can wait for these events and start processing the samples right after receiving the event.
Events are declared in the following way:
K_EVENT_DEFINE(event);

enum {
  EV_LED_FOUND = BIT(1),
  EV_CONNECTED = BIT(2),
  EV_HANDLE_FOUND = BIT(3),
  EV_STATE_READ = BIT(4),
  EV_STATE_WRITTEN = BIT(5),
};
Events are represented as bits of a 32-bit integer, which means that you can have a maximum 32 events per event object. The receiving thread can wait for one specific or multiple different events and the sender thread can send one or multiple events. You have two functions for sending an event:
| k_event_post() | Replace the old events with the given events. |
| k_event_set() | Merge the given events with the already set one. |
We will only use k_event_post() to override the currently set events with a new event because our events occur sequentially and not at the same time. With all this information, let us take a look at the work handler function, which implements the actual state machine logic using events:
static void work_handler(struct k_work *work) {
  int ret;

  if (led_conn == NULL) {
    start_scan();
    ret = k_event_wait(&event, EV_LED_FOUND, false, K_MSEC(EVENT_TIMEOUT_MS));
    if (!ret) {
      printk("LED not found\n");
      stop_scan();
      k_sem_give(&sem);
      return;
    }

    connect();
    k_event_wait(&event, EV_CONNECTED, false, K_MSEC(EVENT_TIMEOUT_MS));
  }

  if (!led_state_handle) {
    discover_led_service();
    k_event_wait(&event, EV_HANDLE_FOUND, false, K_MSEC(EVENT_TIMEOUT_MS));
  }

  read_led_state();
  k_event_wait(&event, EV_STATE_READ, false, K_MSEC(EVENT_TIMEOUT_MS));

  write_led_state();
  k_event_wait(&event, EV_STATE_WRITTEN, false, K_MSEC(EVENT_TIMEOUT_MS));

  k_sem_give(&sem);
}
The work handler starts by checking if we are already connected. If not, we start scanning for the Smart LED advertisements. The function k_event_wait() puts the work handler into idle for as long as the event EV_LED_FOUND has not been sent. The event itself is set by the advertisement parser callback we will look at later, after successfully finding the Smart LED. If no Smart LED can be found, the worker thread will run into a timeout, stop scanning, give the semaphore back, and stop executing.
Once we found the Smart LED, we connect to it and wait for the connection to get established. After ensuring the connection, we check if we have already stored the LED state characteristics handle. If not, we start the service discovery and obtain it. With the handle, we can read the current value of the LED state and write the toggled value back.
Lastly, we give the semaphore back, thus enabling the state machine logic to repeat on the next button press. That was a lot! Let us take a look at each of these steps separately!
Scaning and Parsing Advertisement Data
The Smart LED periodically sends out small BLE packages called advertisements. These packages contain the connection-related information (e.g.: whether establishing a connection is allowed or not), the device address, and the UUID of the LED service. During the scanning phase, the Smart Button scans all incoming BLE advertisements for the LED service UUID. If it is found, the Smart LED’s address is stored and the Smart LED tries to establish a connection.
The following function sets the scan parameters and starts the scanning:
void start_scan() {
  int err;

  struct bt_le_scan_param scan_param = {
      .type = BT_LE_SCAN_TYPE_PASSIVE,
      .options = BT_LE_SCAN_OPT_NONE,
      .interval = BT_GAP_SCAN_FAST_INTERVAL,
      .window = BT_GAP_SCAN_FAST_WINDOW,
  };

  err = bt_le_scan_start(&scan_param, device_found_cb);
  if (err) {
    printk("Scanning failed to start (err %d)\n", err);
    return;
  }

  printk("Scanning successfully started\n");
}
Let us go through the scan parameter:
| BT_LE_SCAN_TYPE_PASSIVE | Don’t request scan response data |
| BT_LE_SCAN_OPT_NONE | No Options |
| BT_GAP_SCAN_FAST_INTERVAL | Scan interval of 60ms |
| BT_GAP_SCAN_FAST_WINDOW | Scan window of 30ms |
The first parameters sets our scanning mode to passive, which means that it will not request additional advertisement data from any peripheral. This additional data is called scan response data, and can be used by peripherals to send more information to the central on request. Our Smart LED does not implement scan response data.
Keep in mind the difference between the scan window and the scan interval: In our current configuration the Smart Button will scan every 60ms (interval) for about 30ms (window).
These parameters are passed to the function bt_le_scan_start() together with a device_found callback. This callback is fired every time our Smart LED receives an advertisement package:
static void device_found_cb(const bt_addr_le_t *addr, int8_t rssi,
                            uint8_t type, struct net_buf_simple *ad) {
  bt_data_parse(ad, led_found_cb, (void *)addr);
}
The callback receives the following parameters form the BLE stack:
| const bt_addr_le_t *addr | BLE address of the peripheral |
| int8_t rssi | Received signal strength indication |
| uint8_t type | Type of advertisement |
| struct net_buf_simple *ad | Advertisement data |
We don’t do much in the callback, we just pass the advertisement data, a callback function, and the address to bt_data_parser(). This function deconstructs the raw advertisement data and splits it up into parts.
Advertisement data can consist of different parts: E.g., you can advertise multiple service UUIDs in a single advertisement package. The function bt_data_parser() will now take them apart and call your callback for each of the parts individually.
The actual processing of the advertisements happens in the callback function led_found_cb():
static bool led_found_cb(struct bt_data *data, void *user_data) {
  struct bt_uuid_128 found_uuid;
  int err;

  // we are only interested in ads with a single 128-bit UUID
  if ((data->type != BT_DATA_UUID128_ALL) ||
      (data->data_len != BT_UUID_SIZE_128)) {
    return true;
  }

  // check if the found UUID matches
  bt_uuid_create(&found_uuid.uuid, data->data, BT_UUID_SIZE_128);
  if (bt_uuid_cmp(&found_uuid.uuid, &led_svc_uuid.uuid) != 0) {
    return true;
  } else {
    printk("LED service found.\n");
    memcpy(&led_address, user_data, BT_ADDR_LE_SIZE);
    stop_scan();
    k_event_set(&event, EV_LED_FOUND);
    return false;
  }
}
Remember that our Smart LED only ever advertises the LED service UUID! This makes writing the callback quite easy. The function receives the advertisement data in a preprocessed form, we can directly access the type and length of the data.
We only process ads that contain data of type BT_DATA_UUID128_ALL which must also be 128bit long. After this sanity check we copy the UUID from the ad into the variable found_uuid using the function bt_uuid_create(). This copied UUID can now be compare the our known LED service UUID. If a match is found, we can store the Smart LED’s address and stop scanning. The function for stopping the scanning process is quite trivial:
static void stop_scan() {
  int err = bt_le_scan_stop();
  if (err) {
    printk("Stop LE scan failed (err %d)\n", err);
  } else {
    printk("Scanning successfully stopped.\n");
  }
}
Finally, we set the event EV_LED_FOUND, so that our state machine can continue to the next state.
Connecting
Now that we know the Smart LED’s address and we can connect to it. The following function starts a connection attempt with default parameters:
static void connect() {
  struct bt_le_conn_param *param = BT_LE_CONN_PARAM_DEFAULT;
  int err;

  err = bt_conn_le_create(&led_address, BT_CONN_LE_CREATE_CONN,
                          BT_LE_CONN_PARAM_DEFAULT, &led_conn);
  if (err) {
    printk("Create conn failed (err %d)\n", err);
  }
}
We have to pass the Smart LED’s address and the connection parameters to the function bt_conn_le_create(). The connection-related data will be stored in the global variable led_conn.
How do you know that the connection attempt is successful? You guessed it! With callback functions! With the macro BT_CONN_CB_DEFINE you can specify two callbacks that get fired when a connection is established or when a disconnect happens:
static void connected(struct bt_conn *conn, uint8_t conn_err) {
  if (!conn_err) {
    printk("Connected.\n");
    k_event_set(&event, EV_CONNECTED);
  } else {
    printk("Failed to connect.\n");
    bt_conn_unref(led_conn);
    led_conn = NULL;
  }
}

static void disconnected(struct bt_conn *conn, uint8_t reason) {
  printk("Disconnected.\n");
  bt_conn_unref(led_conn);
  led_conn = NULL;
}

BT_CONN_CB_DEFINE(conn_callbacks) = {
    .connected = connected,
    .disconnected = disconnected,
};
In the callback connected(), we set the event EV_CONNECTED in case of a successful connection. We currently don’t handle the case of an unsuccessful connection, you would need to include states for handling that scenario in a production app. All we do is call bt_conn_unref() which decrements the connection’s reference count (used by the BLE stack for bookkeeping). For the callback disconnected() we do the same.
Service Discovery
We are connected! Great now all we need to do is read the current state of the Smart LED and set a new one. How do we do that? Well, we know the UUID of the LED state characteristic, so it must be straightforward? Not so fast! The custom UUID would be far too long to send with each read or write. If you are accessing a BLE characteristic (or attribute in ATT terms), you need to know its attribute handle.
The attribute handle is a 16-bit value representing a (possible) 128-bit UUID. How do you acquire the handle for our attribute LED state? With a process called service discovery! The following function starts a service discovery:
static struct bt_gatt_discover_params discover_params;

static void discover_led_service() {
  int err;

  discover_params.uuid = &led_state_char_uuid.uuid;
  discover_params.func = led_service_discover_cb;
  discover_params.start_handle = BT_ATT_FIRST_ATTRIBUTE_HANDLE;
  discover_params.end_handle = BT_ATT_LAST_ATTRIBUTE_HANDLE;
  discover_params.type = BT_GATT_DISCOVER_CHARACTERISTIC;

  err = bt_gatt_discover(led_conn, &discover_params);
  if (err) {
    printk("Discover failed(err %d)\n", err);
    return;
  }
}
Service discovery is needs multiple parameters:
| uuid | The LED state UUID |
| func | The callback function to execute once the service is found |
| start_handle | Attribute handle to start searching from: 0x0000 |
| end_handle | Attribute handle to stop searching at: 0xFFFF |
| type | Type of attributes to discovery: Characteristics only |
The process is simple: The Smart LED starts searching at handle 0 until until it finds the proper handle of the LED state attribute (maximum to handle 0xFFFF). Once the handle is found, the callback function led_service_discover_cb() is called:
static uint8_t led_service_discover_cb(struct bt_conn *conn,
                                       const struct bt_gatt_attr *attr,
                                       struct bt_gatt_discover_params *prms) {
  led_state_handle = bt_gatt_attr_value_handle(attr);
  printk("LED Control value handle %u\n", led_state_handle);
  k_event_set(&event, EV_HANDLE_FOUND);
  return BT_GATT_ITER_STOP;
}
In the callback we store the attribute handle in the global variable led_state_handle, stop the service discovery, and set the event EV_HANDLE_FOUND.
Reading the LED State
With the attribute handle, we can finaly read the current state of the LED:
static void read_led_state() {
  printk("Reading current LED state\n");
  static struct bt_gatt_read_params read_params;
  read_params.handle_count = 1;
  read_params.single.handle = led_state_handle;
  read_params.single.offset = 0;
  read_params.func = read_func;
  bt_gatt_read(led_conn, &read_params);
}
The parameters needed are simple: You specify how many attributes you want to read in the handle_count, set the handle to our discovered handle stored in led_state_handle, set the offset to 0, and specify the read callback function.
After configuring the parameters, you can start reading the attribute with bt_gatt_read(). Once the value is successfully read, the callback function read_func() is called:
static uint8_t read_func(struct bt_conn *conn, uint8_t err,
                         struct bt_gatt_read_params *params, const void *data,
                         uint16_t length) {
  led_state = *((uint8_t *)data);
  printk("LED Control value: %u\n", led_state);
  k_event_set(&event, EV_STATE_READ);
  return BT_GATT_ITER_STOP;
}
The read callback provides us with the attribute’s value in the parameter data. In a production app, you would check the length of the data, but in our case, we know that it will always be of length 1. We can therefore cast the pointer to a uint8_t pointer, dereference it, and store the value into the global variable led_state. After that, we can set the event EV_STATE_READ and continue.
Writing the LED State
We are nearly done! Let us toggle and write the new state to the Smart LED. The following function first inverts the state of the LED, then prepares the write parameters, and finally sends the GATT write command:
static void write_led_state() {
  static struct bt_gatt_write_params write_params;

  printk("Current LED state %s - turning LED %s\n", led_state ? "on" : "off",
         led_state ? "off" : "on");
  led_state = !led_state;

  write_params.handle = led_state_handle;
  write_params.offset = 0;
  write_params.data = &led_state;
  write_params.length = 1;
  write_params.func = write_func;
  bt_gatt_write(led_conn, &write_params);
}
The parameters are self-explanatory: Provide the LED state attribute handle, the offset to write to, a reference to the value you want to write, the length of the data, and a callback function which is called when the GATT write is performed.
Pass the parameters to the function bt_gatt_write(). Once the write operation is done, the callback write_func() will be fired:
static void write_func(struct bt_conn *conn, uint8_t err,
                       struct bt_gatt_write_params *params) {
  if (err) {
    printk("Write did not work: err %u\n", err);
  } else {
    printk("Turned LED %s\n", led_state ? "on" : "off");
  }
  k_event_set(&event, EV_STATE_WRITTEN);
}
The callback does not contain any more logic. We print success or error and set the event EV_STATE_WRITTEN. This final event will end the state machine, allowing the whole process to start again on the next button press.
We did it! We successfully toggled the state of the Smart LED!
Summary
In this blog post we programmed an ESP32 to act as a Smart Button which is capable of toggling the Smart LED we created in the previous post. On each button press an event-based state machine is started in a worker thread, that performs all necessary steps successively. First, we had to parse advertisements for the Smart LED’s service UUID to obtain its BLE address. Once we had the address, we started a service discovery to request the attribute handle associated with the LED state attribute. Using the handle, we read the current state of the LED, toggled it, and wrote the new state back.
I hope this post helped you to understand how to implement a BLE central using Zephyr. Stay tuned for the next one!
Parts
- Zephyr Basics: Bluetooth Low Energy (BLE) - Part 1: Peripheral
- Zephyr Basics: Bluetooth Low Energy (BLE) - Part 2: Central