Zephyr Basics: Bluetooth Low Energy (BLE) - Part 1: Peripheral
Welcome back to Zephyr basics! In the last post, we took a look at Zephyr’s GPIO API. Now we will apply this knowledge to build a remotely controlled LED using two ESP32s and Bluetooth Low Energy (BLE)!
BLE is one of the most common communications standards for smart devices. It enables the exchange of information with low cost and low power. Thanks to the wide availability of smartphones, there are billions of BLE-enabled devices on the market. If you learn how to program your own, you unlock a valuable skill for yourself.
Zephyr is built with BLE in mind and provides excellent APIs. Let us together review the basics of BLE and then dive into the Zephyr APIs! We will start by implementing a peripheral. After reading this post, you will be able to program an ESP32 to be a remote-controllable Smart LED. You can use any BLE app from the AppStore to turn the LED on or off.
In a future post, we will program a second ESP32 to make a Smart Button!
Prerequisites
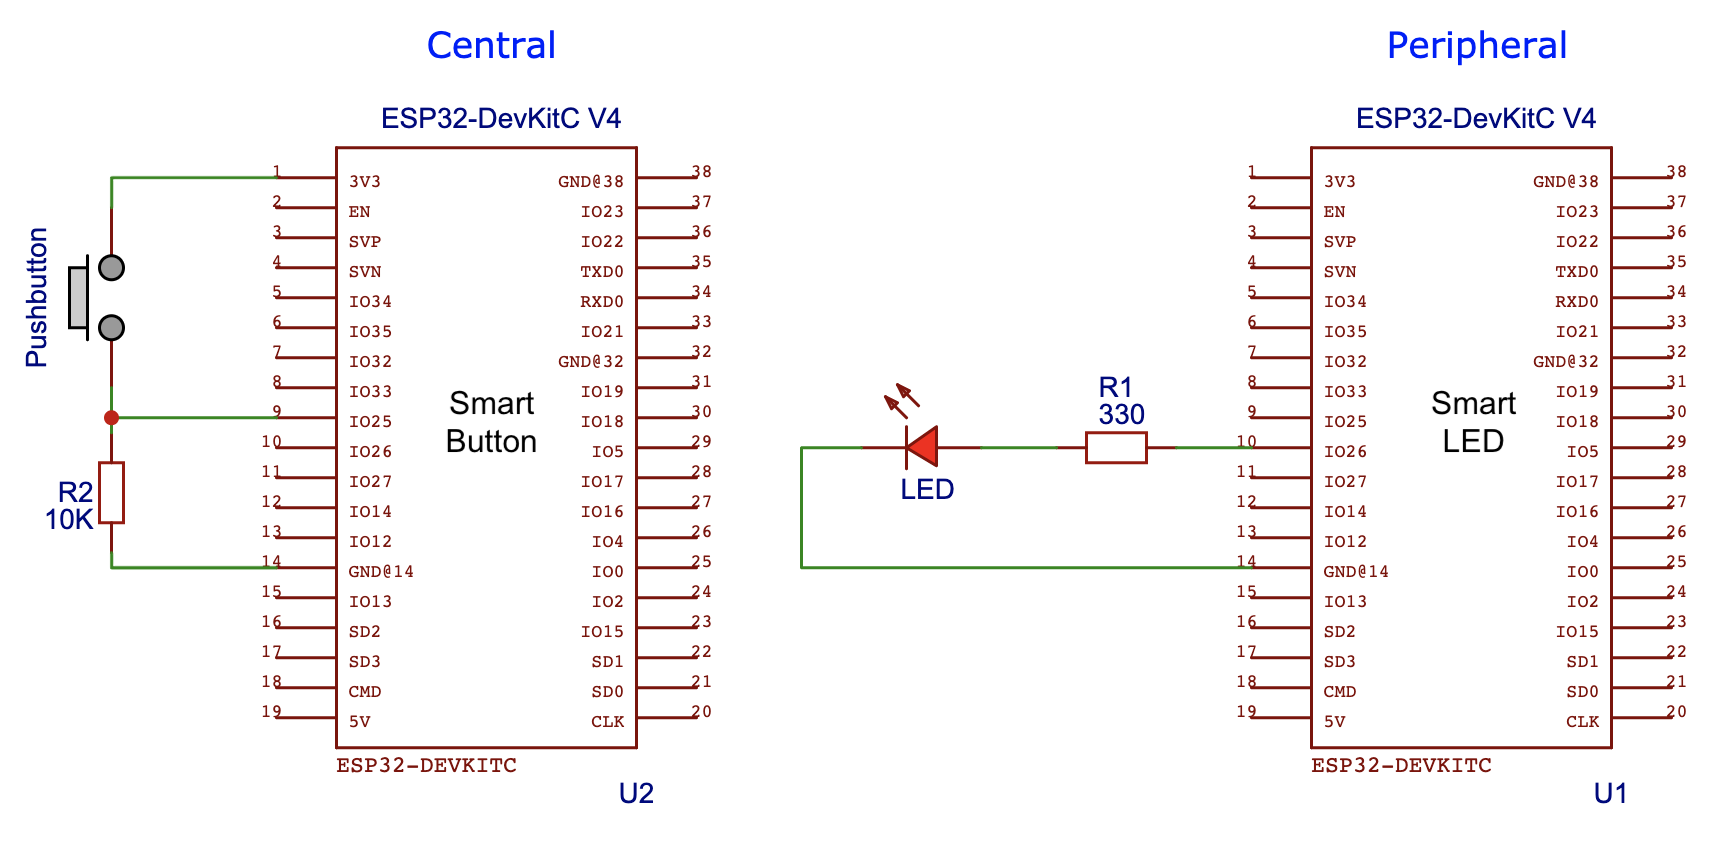
I am using two ESP32 Dev Kit C4 for this tutorial, but you may use any other BLE-enabled board/controller supporting Zephyr. If you haven’t already, please read my post about GPIOs first. I covered LEDs, buttons, and devicetree overlays. To follow along, connect a pushbutton with a pull-down resistor to the Smart Button and an LED with a resistor to the Smart LED:
BLE Basics
Generic Access Profile (GAP)
How does BLE work? In most cases, you have a small low-power device communicating with a more capable one. For example, temperature sensors distributed in your home periodically send their measurements to your central heating. In this scenario the communication is one-way. The central heating does not need to send data back. It is sufficient if the temperature sensors periodically send their measurements and the central heating reads them. The roles are clearly defined: Sensors are Broadcasters, while the central heating is an Observer. Broadcaster and observer are two roles of the Generic Access Profile (GAP). GAP is the layer in the BLE stack that specifies how devices discover each other and interact.
In this tutorial, we will need two other roles: Central and Peripheral. Our Smart LED does not need to periodically broadcast that it is on or off. Nevertheless, it must let other devices know of its existence and that it provides a service to read and set the state of the LED. This process is called advertising: The Smart LED periodically sends out small packages of data containing information such as the device address, what services it offers, and whether it allows a central to connect or not. This process is typical for a peripheral device. Our Smart Button (in the role of a central) scans for the LED advertisements. If it finds the Smart LED it parses the advertisements for the proper service UUID. Once it finds the right one, it establishes a connection. With an established connection, the Smart Button can toggle the state of the Smart LED.
Generic Attribute Profile (GATT)
After the advertisement and connection phase, governed by GAP has finished and two devices connect, we can use the Generic Attribute Profile (GATT) as a formalized way of accessing the Smart LEDs functionality. GATT defines which services and data BLE devices offer. It uses the Attribute Protocol (ATT) to define how the data is structured using so-called services and characteristics. With these, you can model the capabilities of a BLE device similar to an object in programming.
Services and characteristics are programmatically stored within a peripheral in form of a look-up table (called Attribute Table). For each entry, you need to specify a Universal Unique Identifier (UUID), permissions flags (read, write, notify, …), and callback functions. You can either check out the list of pre-defined characteristics here or create custom 128-bit UUIDs for your own needs.
Attention: GATT uses different terms than GAP! In GATT the Smart LED (our peripheral) is called a Server and the Smart Button (our central) is called a Client!
Peripheral - Smart LED
Let us start with the implementation! We will create our own service and characteristic: The Smart LED contains a single service called LED Service which in turn contains a single characteristic called LED State. This will allow the Smart Button to read the current state of the LED and set a new one.

Hardware Setup
First, set up the LED similarly to my post about GPIOs. Create the following two files in the root folder of your project:
esp32.overlay:
/ {
	leds {
		compatible = "gpio-leds";
		led0: led_0 {
			gpios = <&gpio0 26 GPIO_ACTIVE_HIGH>;
		};
	};
};
prj.conf:
CONFIG_GPIO=y
CONFIG_BT=y
CONFIG_BT_PERIPHERAL=y
CONFIG_BT_DEVICE_NAME="Smart LED"
With the devicetree overlay, we can reference the LED in our program using the name led0, instead of hard coding the pin number. The following code does all the hardware setup:
#include <drivers/gpio.h>
#include <zephyr.h>

// LED Device
#define LED DT_NODELABEL(led0)
static const struct gpio_dt_spec led = GPIO_DT_SPEC_GET(LED, gpios);

static uint8_t led_state = false;

void main(void) {
  // make sure the LED device is ready
  if (!device_is_ready(led.port)) {
    return;
  }
  gpio_pin_configure_dt(&led, GPIO_OUTPUT);
  gpio_pin_set_dt(&led, led_state);
}
First, we fetch the device specifications of the LED (sounds fancy but in this case, we only need the pin number!) and store it in the static variable led. The state of the LED is stored in the variable led_state. In the main function, we first check if the LED device is ready (in a real production app you would need to handle the error case as well!). Afterward, we set the pin as output and turn the LED off.
Advertising
After the hardware setup, the Smart LED starts to periodically advertise the LED State’s UUID to let the Smart Button know about its existence. Before we can do this, we need to specify UUIDs for the service and the characteristic:
// Service and Characteristics UUIDs
static struct bt_uuid_128 led_state_char_uuid = BT_UUID_INIT_128(
    BT_UUID_128_ENCODE(0x9c85a726, 0xb7f1, 0x11ec, 0xb909, 0x0242ac120002));

#define LED_SERVICE_UUID_VAL \
  BT_UUID_128_ENCODE(0xf7547938, 0x68ba, 0x11ec, 0x90d6, 0x0242ac120003)

static struct bt_uuid_128 led_svc_uuid =
	BT_UUID_INIT_128(LED_SERVICE_UUID_VAL);
The macro BT_UUID_128_ENCODE takes a UUID in a (more or less) human-readable form and converts it into array values. These values are then passed to the macro BT_UUID_INIT_128 to initialize a struct of type bt_uuid_128.
We separate the encoding from the initialization for the service UUID, because we need the encoded array values a second time, for creating the advertisement payload:
// Advertisement Data
static const struct bt_data ad[] = {
    BT_DATA_BYTES(BT_DATA_FLAGS, (BT_LE_AD_GENERAL | BT_LE_AD_NO_BREDR)),
    BT_DATA_BYTES(BT_DATA_UUID128_ALL, LED_SERVICE_UUID_VAL),
};
The advertisement data only contains flags and our LED Service UUID. The flags have the following meaning:
| BT_LE_AD_GENERAL | Periodic indefinite advertising. |
| BT_LE_AD_NO_BREDR | Classic Bluetooth not supported. |
Keep in mind: With each advertisement package, the Smart Button also sends its address, a checksum, and other data. You can find a deep dive into BLE package format here.
After specifying the UUIDs and the advertisement data, we can enable BLE and start advertising in the main function:
// initialize BLE
err = bt_enable(NULL);
if (err) {
  printk("Bluetooth init failed (err %d)\n", err);
  return;
}
printk("Bluetooth initialized\n");

// start avertising
err = bt_le_adv_start(BT_LE_ADV_CONN_NAME, ad, ARRAY_SIZE(ad), NULL, 0);
if (err) {
  printk("Advertising failed to start (err %d)\n", err);
  return;
}
printk("Advertising successfully started\n");
If you pass the parameter BT_LE_ADV_CONN_NAME into the function bt_le_adv_start(), Zephyr will include the device name into the advertisement payload. The device name is specified in the prj.conf file.
If you fire up your favorite BLE scanner app, you should be able to see the Smart LED now advertising our LED Service:
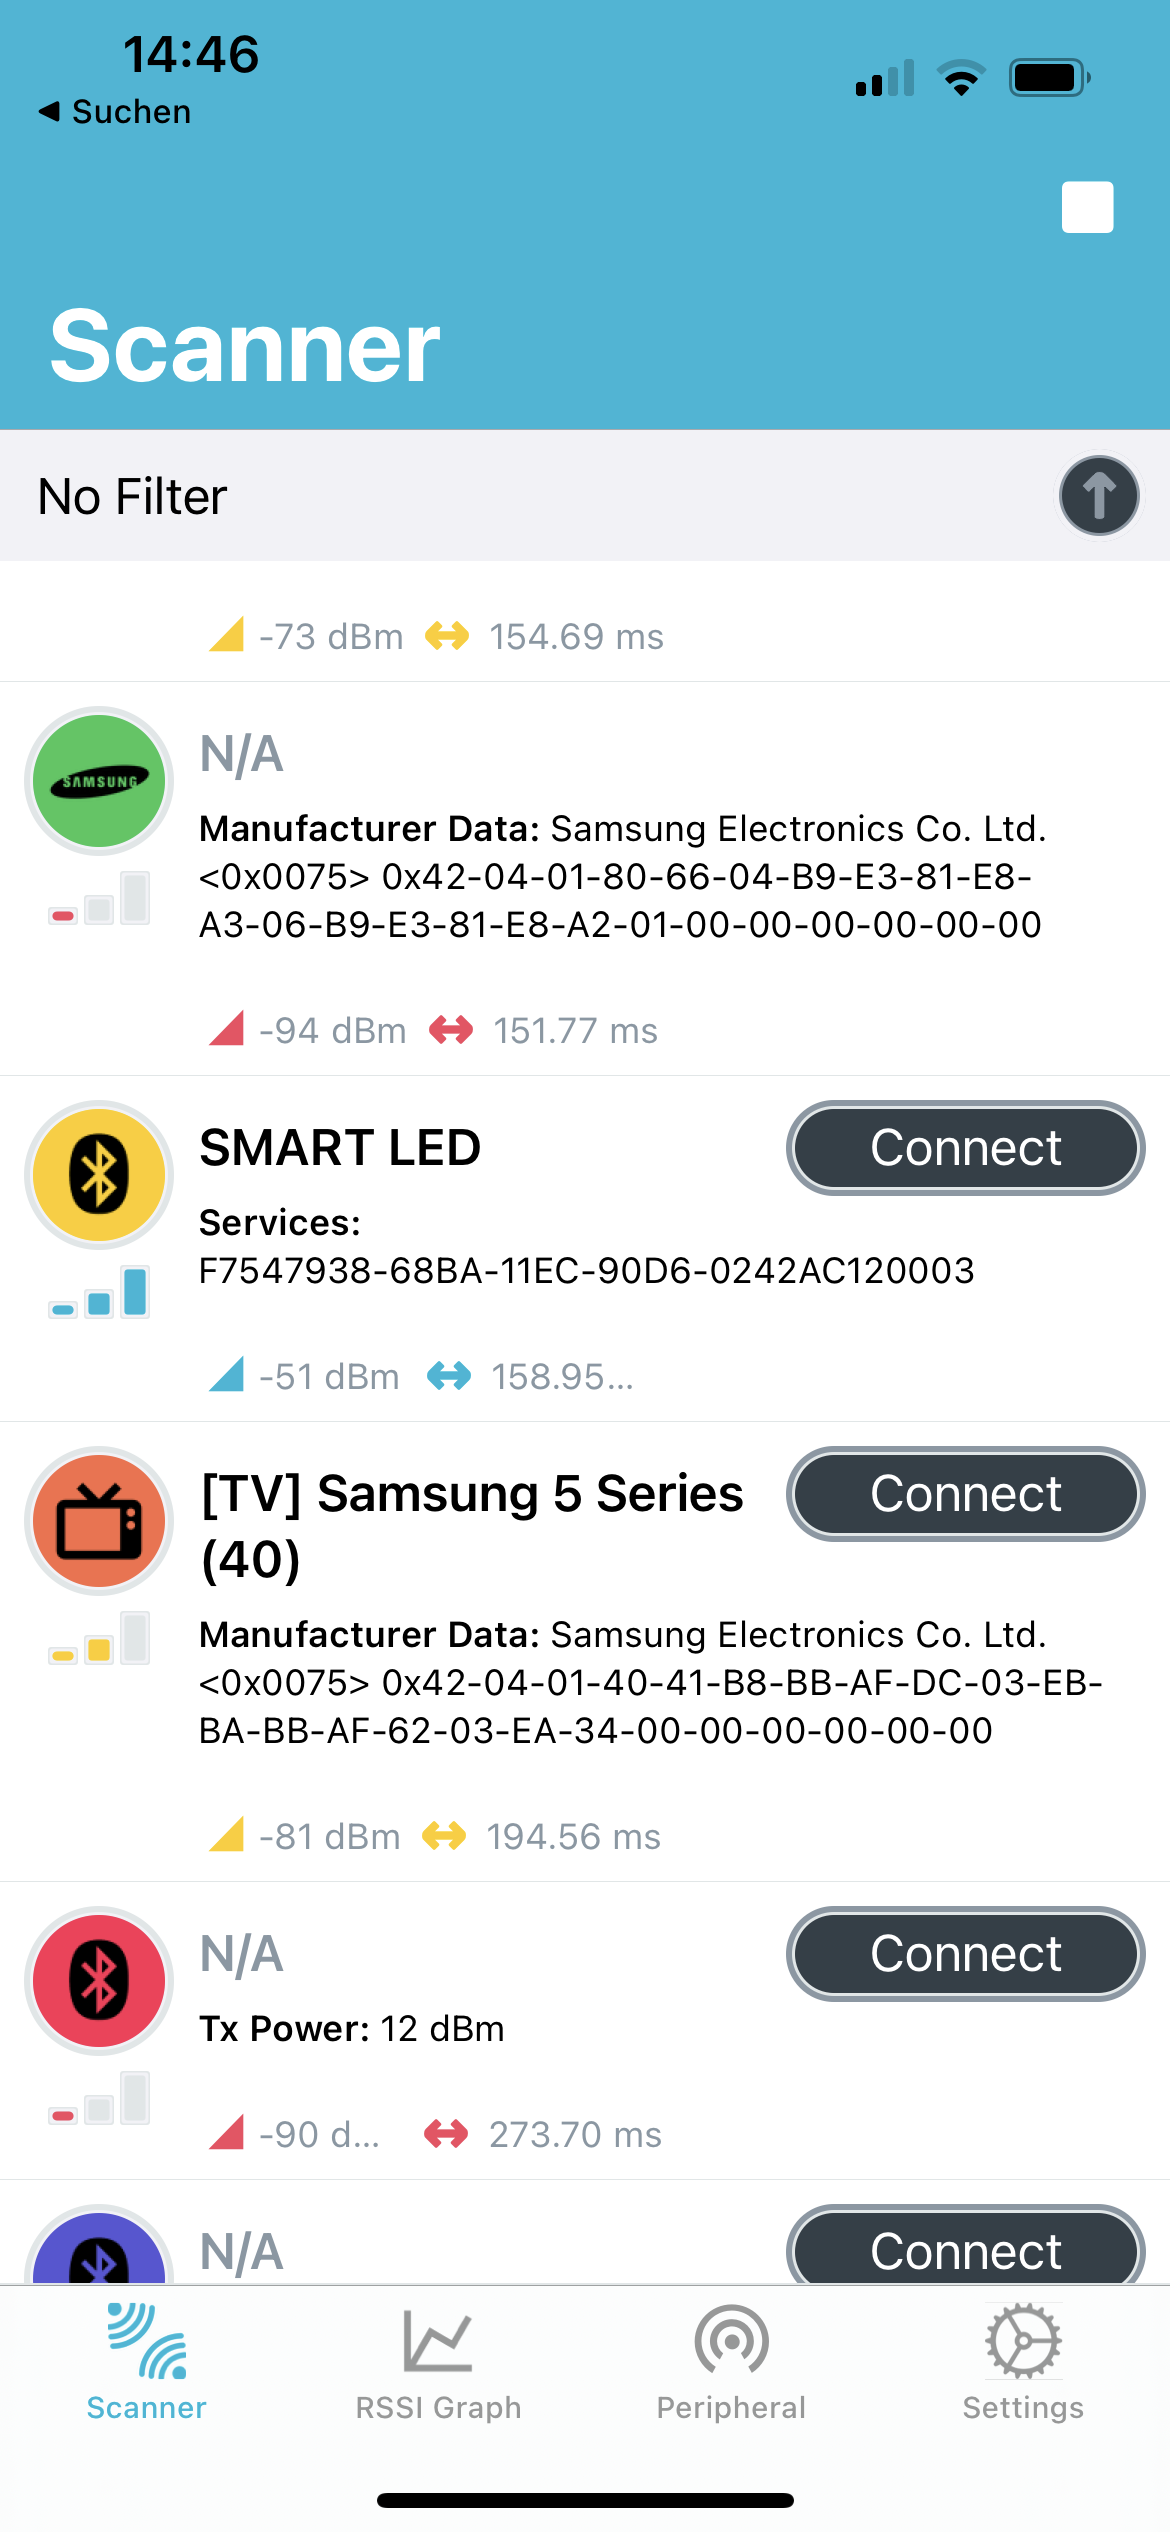
You can even connect to it, but you won’t be able to do anything. Let’s fix that!
GAP Callbacks
Zephyr allows us to register callback functions to react if a central device wants to connect to (or disconnect from) our peripheral:
static void connected(struct bt_conn *conn, uint8_t err) {
  if (err) {
    printk("Connection failed (err 0x%02x)\n", err);
  } else {
    printk("Connected\n");
  }
}

static void disconnected(struct bt_conn *conn, uint8_t reason) {
  printk("Disconnected (reason 0x%02x)\n", reason);
}

BT_CONN_CB_DEFINE(conn_callbacks) = {
    .connected = connected,
    .disconnected = disconnected,
};
Simple create the two callbacks with the appropriate function signatures and register them using the macro BT_CONN_CB_DEFINE. We won’t use them for the logic of the Smart LED, but they will prove useful for the Smart Button. At least you will see some print statements now once you connect with the app.
Attribute Table
The attribute table is created by Zephyr, you can define and register a service using the macro BT_GATT_SERVICE_DEFINE:
BT_GATT_SERVICE_DEFINE(
    led_svc, BT_GATT_PRIMARY_SERVICE(&led_svc_uuid),
    BT_GATT_CHARACTERISTIC(&led_state_char_uuid.uuid,
                           BT_GATT_CHRC_READ | BT_GATT_CHRC_WRITE,
                           BT_GATT_PERM_READ | BT_GATT_PERM_WRITE,
                           read_led_state, write_led_state, &led_state), );
The first parameter is the name, the second parameter declares that the service is a primary service (you can also create secondary ones, but this is rarely used).
After that, you list all characteristics that the service contains (in our case it is only our LED State characteristic). The characteristic is specified using yet another macro called BT_GATT_CHARACTERISTIC (Zephyr uses macros quite extensively!).
To specify the characteristic you pass in the UUID, characteristic properties, attribute permissions, read and write callbacks, and the data (in our case a reference to the led_state variable). Don’t be confused by the seemingly duplicate information you get from characteristic properties vs attribute permissions. The characteristic properties are sent to the client (the Smart Button), to inform it what it may do with the characteristic. The attribute permissions are for the server (the Smart LED) to know which operations on the characteristics are allowed.
Let’s take a look at the callbacks, starting with the one that gets fired if a characteristic is read:
static ssize_t read_led_state(struct bt_conn *conn,
                             const struct bt_gatt_attr *attr, void *buf,
                             uint16_t len, uint16_t offset) {
  const uint8_t *val = attr->user_data;
  printk("Value 0x%x read.\n", *val);
  return bt_gatt_attr_read(conn, attr, buf, len, offset, val, sizeof(*val));
}
The function receives quite a lot of parameters! Let’s go through them:
| conn | Represents the BLE connection. |
| attr | Represents the attribute (the low level representation of a characteristic). |
| buf | A buffer into which you can write the actual value the client will receives. |
| len | Length of the data in the buffer. |
| offset | Offset to start reading from. |
For our use case, we are only interested in attr, from which we get a pointer to the user data the client wants to read. This pointer is stored in the local variable val, we print its current value, and pass it to the function bt_gatt_attr_read(). This helper function takes the value and copies it to the buffer.
Note that we don’t even need to use the attr parameter. We only have one characteristic, so we could directly pass our global variable led_state into the function and ignore all parameters.
So why do you have all these parameters? You could write a more general read function and use it for more than one characteristic! The parameter attr contains the UUID of the characteristic the callback was called for as a member. Using this information you can then pass different values to the function bt_gatt_attr_read().
Attention: Be careful how much data you expose! It is quite simple to make mistakes here and transfer more than you planned to!
Finally, let’s take a look at the callback that gets fired if a characteristic is written to:
static ssize_t write_led_state(struct bt_conn *conn,
                              const struct bt_gatt_attr *attr, const void *buf,
                              uint16_t len, uint16_t offset, uint8_t flags) {
  uint8_t *val = attr->user_data;
  *val = *((uint8_t *)buf);

  printk("Value 0x%x written.\n", *val);
  printk("Current LED state %s - turning LED %s\n", led_state ? "off" : "on",
         led_state ? "on" : "off");

  gpio_pin_set_dt(&led, led_state);
  return len;
}
The parameters are named similar to the read callback:
| conn | Represents the BLE connection. |
| attr | Represents the attribute (the low-level representation of a characteristic). |
| buf | A buffer with the data the client wants to write. |
| len | Length of the data in the buffer. |
| offset | Offset to start reading from. |
| flags | Attribute write flags (to indicate long write etc.) |
We store the reference to the attribute data into the local variable val and set the value equal to the value of the buffer. This way we can be sure that only one byte of data is copied from the buffer. Remember that attr->user_data points to the variable led_state, so if we copy it into the local variable (pointer) val and change val we directly manipulate led_state.
After the state change, we print the value and debug information (whether the LED is to be turned off or on). The actual state change is then done using the function gpio_pin_set_dt().
Attention: In a production-grade app you would include verification steps (check length and values) ensuring that only valid data can be written to the GPIO!
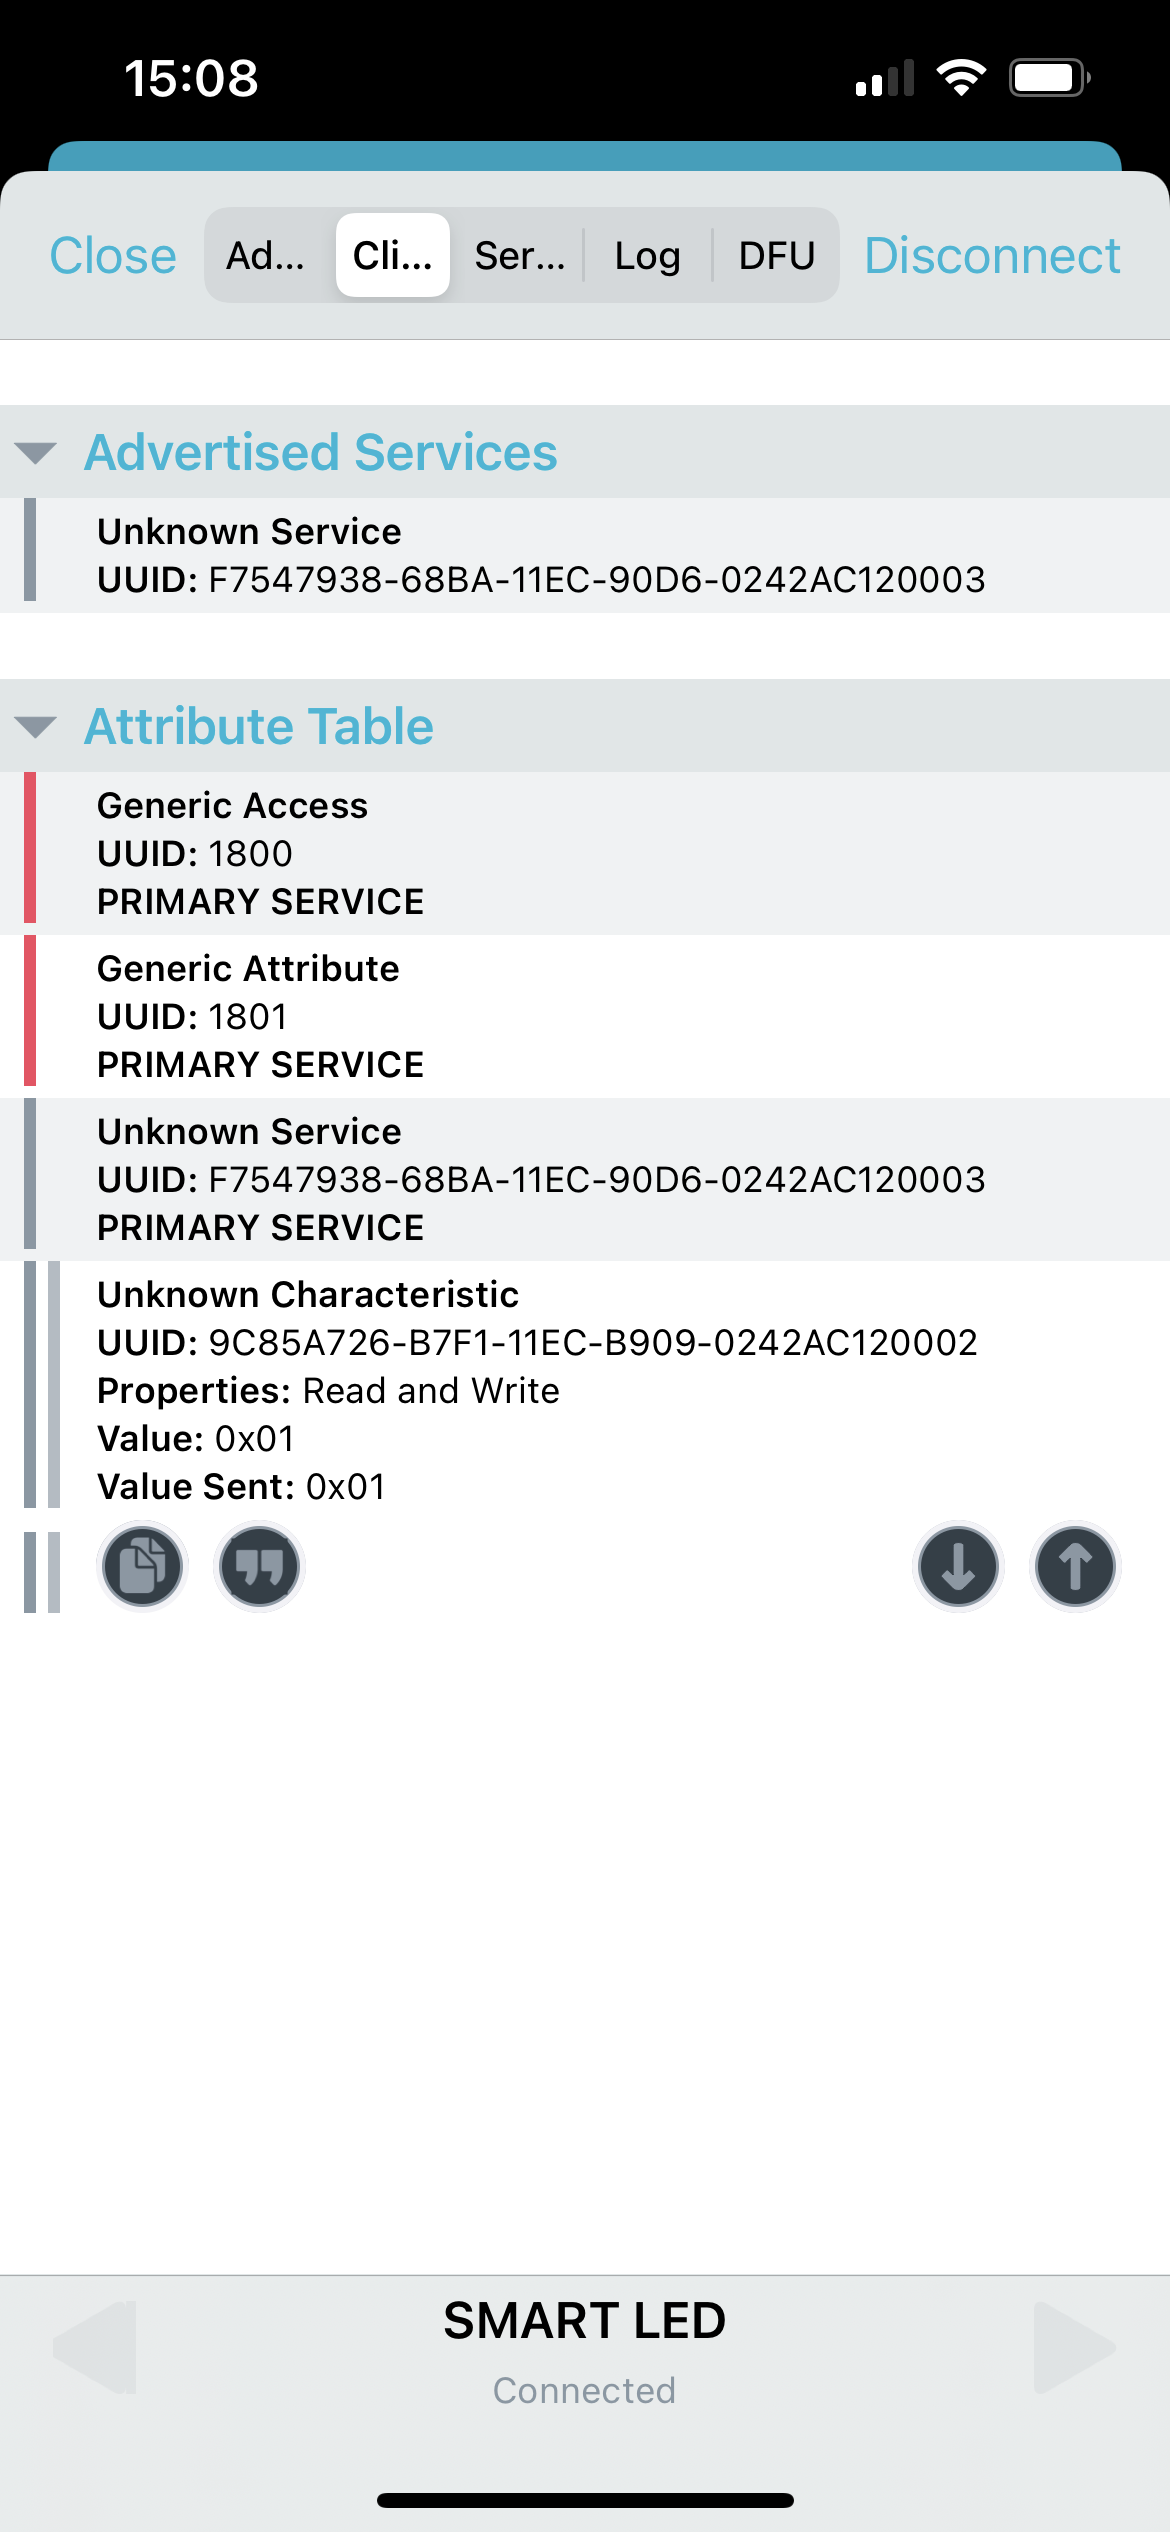
And we are done! Fire up the App again and verify that you can see the attribute table and that you can read and write to the LED State characteristic:
Summary
In this blog post, we first revised the basics of BLE. Afterward, we applied our knowledge by programming an ESP32 to function as a remotely controllable Smart LED. We implemented a custom service and characteristic on the device, allowing a client to set the state of the LED via BLE. The Smart LED is programmed to periodically advertise its service, allow connections, and expose the characteristic to manipulate the state of the LED.
In the next blog post, we will continue the Smart Button. Stay tuned!
Parts
- Zephyr Basics: Bluetooth Low Energy (BLE) - Part 1: Peripheral
- Zephyr Basics: Bluetooth Low Energy (BLE) - Part 2: Central